Getting Started with Your Project Zomboid Server
This guide will take you from a newly purchased server to your first connection. You will learn how to start the server, find its address, set passwords, and sign in as an administrator.
1. Wait for the installation to finish
Immediately after purchase, the control panel installs the game server. While the installation is running, the server cannot be started or configured completely.
- Open the Mikasa Host control panel.
- Select your Project Zomboid server.
- Wait until the installation status disappears and the console becomes available.
Do not reinstall the server or repeatedly press the power buttons while the initial installation is still running.
2. Set the administrator account
Before the first launch, open Startup in the server panel and find these variables:
- Admin Username — the account name used to enter the game as the server administrator;
- Admin Password — the password for that administrator account;
- Server Name — the internal identifier used in the save and configuration file names.
Set a strong admin password and save the changes. Use lowercase Latin characters for the administrator username to avoid compatibility problems.
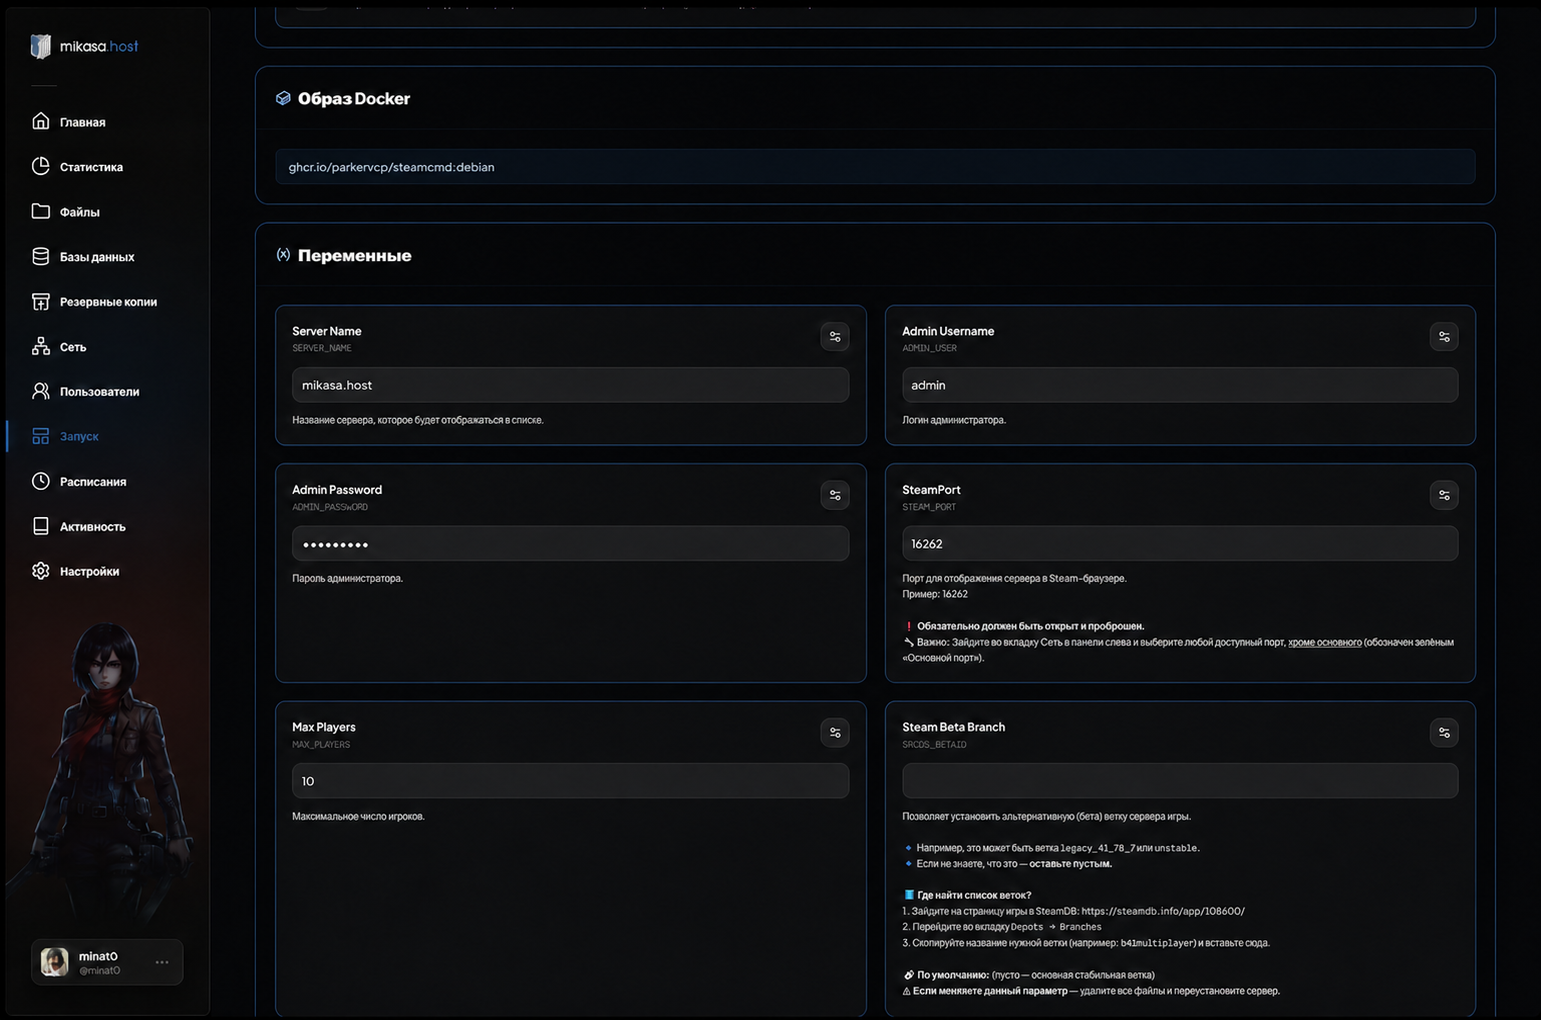
The administrator password is not the password that ordinary players use to enter the server. These are separate settings.
Do not change Server Name after configuring the server
On the first launch, the default Server Name is mikasa.host. Project Zomboid creates a matching set of files, including:
.cache/Server/mikasa.host.ini
.cache/Server/mikasa.host_SandboxVars.lua
.cache/Server/mikasa.host_spawnpoints.lua
.cache/Server/mikasa.host_spawnregions.lua
.cache/Saves/Multiplayer/mikasa.host/
Changing Server Name does not rename or migrate these files. For example, if you change it to my-server, Project Zomboid creates and starts using a new set:
.cache/Server/my-server.ini
.cache/Server/my-server_SandboxVars.lua
.cache/Saves/Multiplayer/my-server/
The old files are not deleted, but their mods, loot settings, sandbox options, and world will no longer be loaded while the new name is selected.
Choose Server Name before configuring mods or the world and avoid changing it later. To change only the name visible in the public list, edit PublicName= in the active .ini file instead.
If you intentionally change Server Name, copy the required settings to the files with the new name or return the old value in Startup. Always stop the server and create a backup first.
3. Configure SteamPort for the public server list
Project Zomboid uses a separate port to advertise the server in the Steam server browser. If you want players to find the server through the public list, configure SteamPort before starting it.
- Open Network in the server panel.
- Find a free allocated port. Do not use the port marked as the Primary Port.
- Copy the additional port number.
- Open Startup.
- Enter the copied number into SteamPort and save the change.
The port must be allocated to the server and accessible from outside. Entering an arbitrary number that is not listed on the Network page will not work.
Then open .cache/Server/{ServerName}.ini and check the public-list settings:
Public=true
PublicName=My Project Zomboid Server
Public=trueallows the server to appear in the public browser;PublicName=sets the name displayed to players.
SteamPort is used to advertise the server. Players who know the primary IP address and port can still connect directly even if the server is hidden from the public list.
4. Start the server
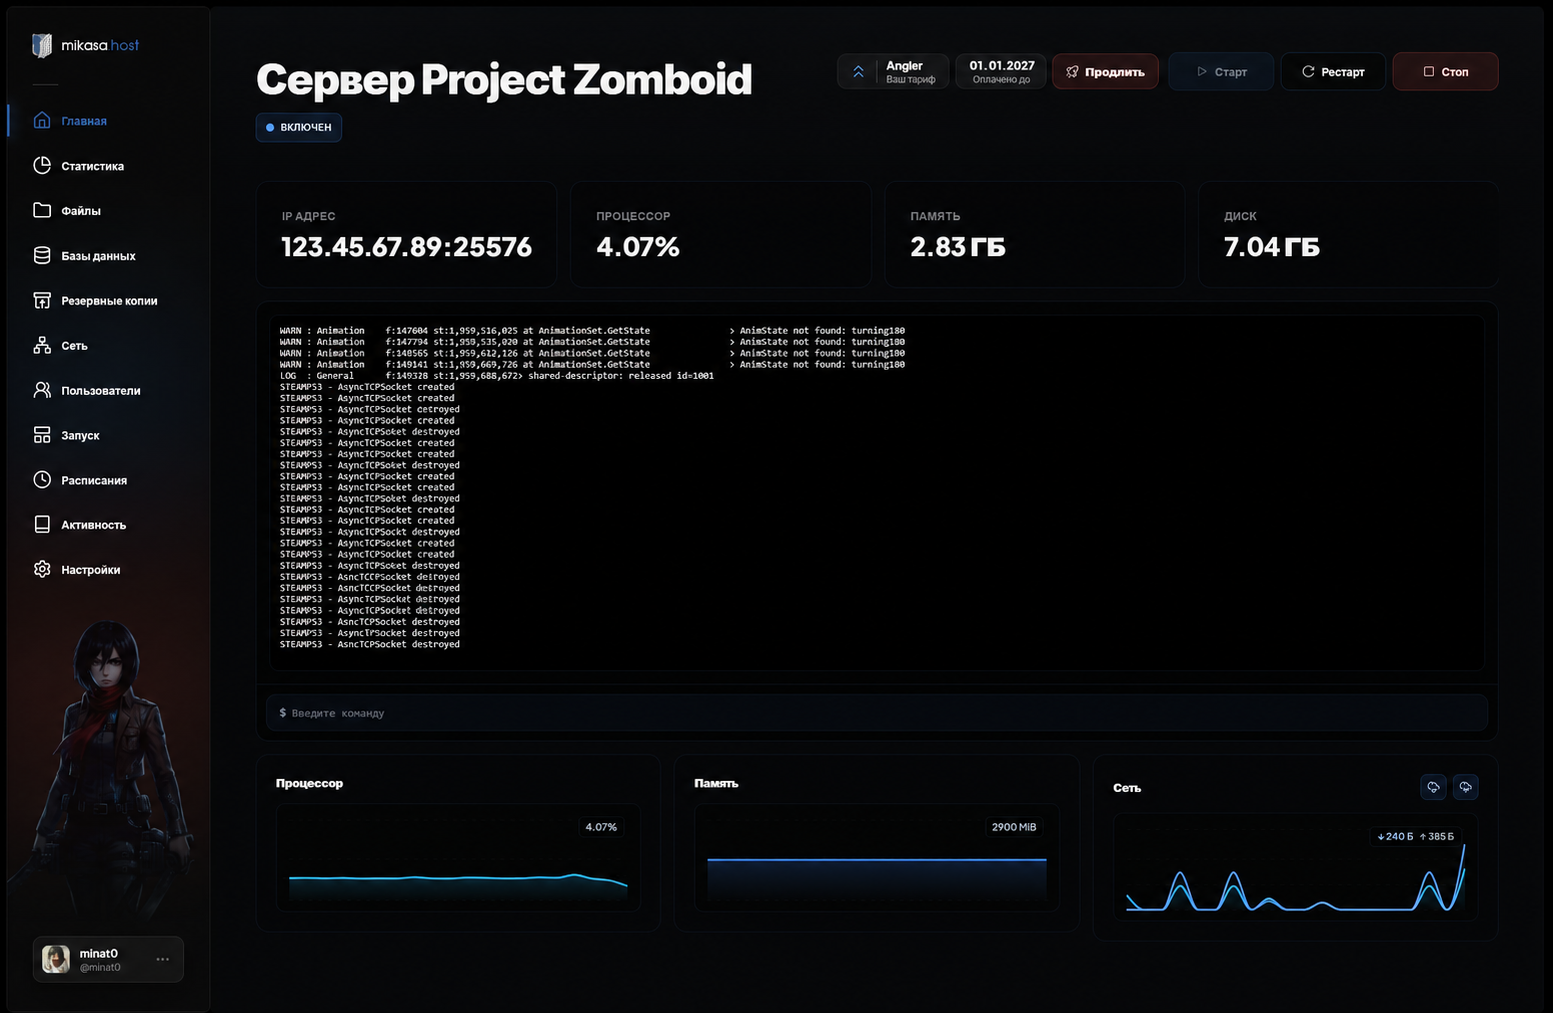
- Open Console.
- Press Start.
- Wait for the server to finish loading. The first launch may take longer because Project Zomboid creates the world and configuration files.
The server address is displayed in the panel in the following format:
123.45.67.89:16261
The part before the colon is the IP address. The number after the colon is the port. You will enter them into separate fields in Project Zomboid.
5. Join the server
- Launch Project Zomboid through Steam.
- Open Multiplayer. In some game versions this button is named Join.
- Open Favorites and select Add Server.
- Enter any convenient name in Server Name or Favorite Name. This is only a local label in your favorites and is not related to the Server Name variable in the hosting panel.
- Enter the address from the panel into two fields:
- IP/Domain — the part before
:; - Port — the number after
:.
- IP/Domain — the part before
- If the server is protected, enter its password in Server Password.
- Save the server and select it in the favorites list.
- Create a player account by entering an Account Username and Account Password.
- Press Connect or Join Server.
The account username and password identify your character on this particular server. They are not your Steam credentials. Use a unique password and do not share it.
6. Join as the administrator
To enter with administrator privileges, use the Admin Username and Admin Password configured in the panel's Startup section as the account credentials on the connection screen.
After joining, the Admin button appears in the game interface. It provides access to player management, server options, teleportation, and other administration tools.
To grant administrator rights to a regular player account without sharing the main admin password, run this command in the panel console:
setaccesslevel "AccountUsername" admin
To remove the rights:
setaccesslevel "AccountUsername" none
For other commands, see the complete Project Zomboid admin commands list.
7. Set or change the server password
The server password restricts who can join. It is different from the administrator password and player account passwords.
- Stop the server.
- Open Files in the control panel.
- Navigate to
.cache/Server/. - Open
{ServerName}.ini. The file name matches Server Name in the Startup section. - Search for
Password=and enter a password after the equals sign:
Password=YourServerPassword
- Save the file and start the server.
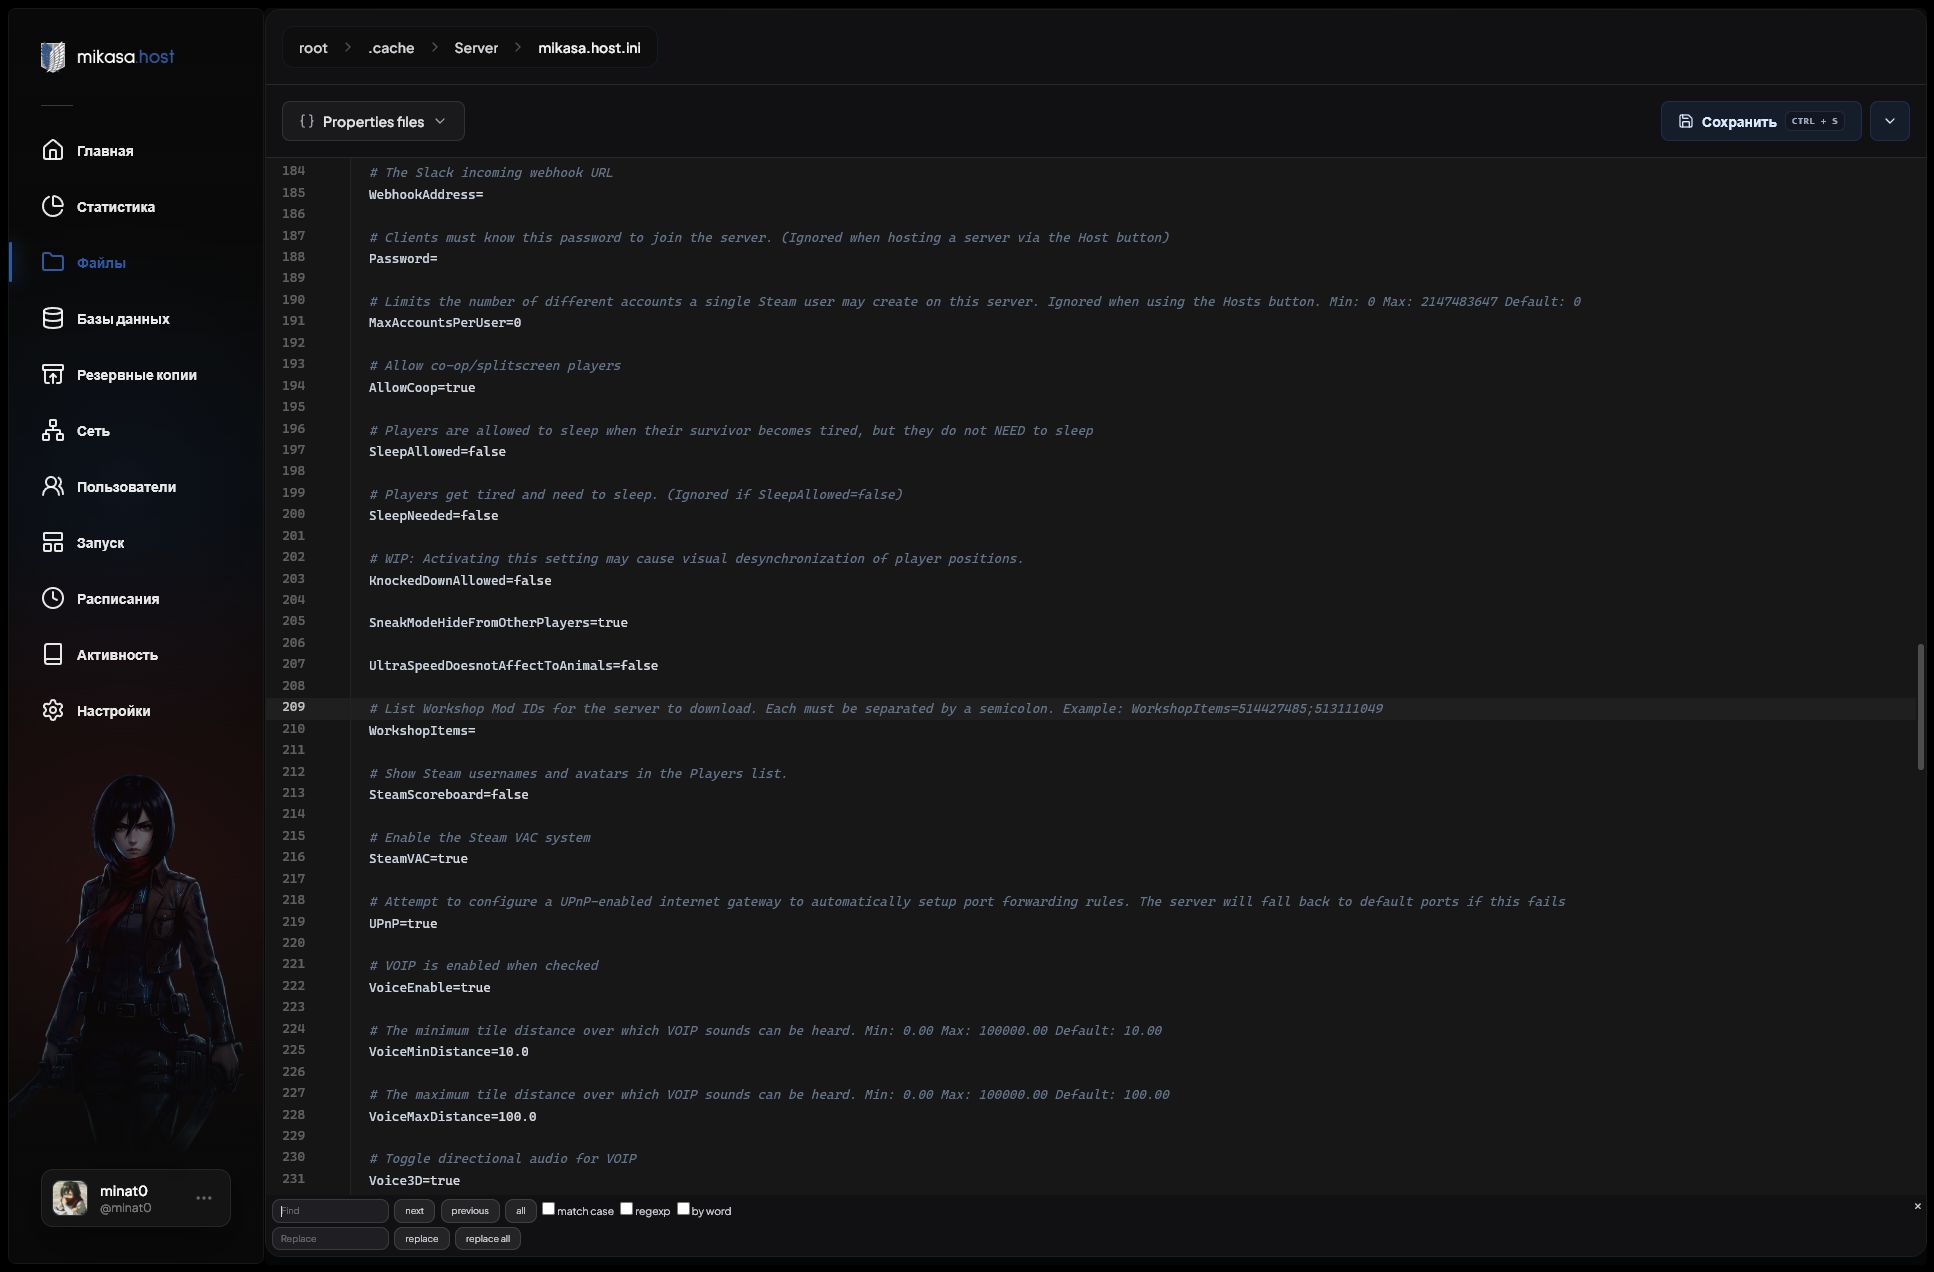
Share this password with players. Do not share the administrator password.
Search for Password= instead of navigating to a specific line. Project Zomboid updates and configuration changes can move the setting.
Three different passwords explained
| Setting | Who uses it | Where it is configured |
|---|---|---|
| Server Password | Everyone joining a private server | Password= in .cache/Server/{ServerName}.ini |
| Account Password | An individual player | Created on the Project Zomboid connection screen |
| Admin Password | The server owner or administrator | Startup section of the Mikasa Host panel |
Common problems
The server is not responding
- Confirm that the server is running in the panel and has finished loading.
- Check that the IP and port are entered into separate fields without
:. - Refresh the favorites list.
- Make sure the game client and server use the same Project Zomboid build.
- If the server has mods, wait for required Workshop items to download.
Invalid username or password
- Do not enter your Steam password.
- For a regular player, use the account created on the connection screen.
- For administrator access, use the credentials from Startup.
- If a username already exists on the server, use its original account password or choose another username.
The server starts and immediately stops
Open the console and read the last error message. Incorrect mods and malformed configuration values are common causes. Send the complete error to Mikasa Host support rather than only the final line.
Mods, loot settings, or the world disappeared
Check whether Server Name was changed in Startup. The server may be using a newly created .ini, _SandboxVars.lua, and save folder while the original data remains under the previous name. Restore the former Server Name or migrate the settings after making a backup.
What to configure next
Once you can join the server, you can:
- add Steam Workshop mods;
- use administrator and console commands;
- edit
{ServerName}.inifor the server name, player limit, whitelist, PvP, and other multiplayer settings; - edit
{ServerName}_SandboxVars.luato change zombie population, loot, infection, time, and world rules.
Always stop the server before editing configuration files and keep a backup before making major changes.